Medical Device Design Project
BME 473 & 474 (Medical Device Design I and II): January 2022 - May 2022, August 2022 - December 2022
During cardiac bypass surgery, the patient's blood is passed outside the body and temperature controlled with devices such as the MCH-1000(i) CardioQuip Cooler Heater Device. The issue with this is that bacteria can accumulate within the device and escape into the operating room as aerosolized particles, leading to patient infection. My team and I attempted to counter this issue by modifying the lid of the CardioQuip device in order to minimize exposure of internal components to the outside operating room environment. Our final design report can be found at the bottom of this page
Background
Need Statement
-
>250,000/yr open heart procedures performed in the US using a cardiopulmonary bypass machine
-
Devices such as CardioQuip Cooler Heater are crucial for controlling patient circulating blood temperature
-
Bacterial accumulation within Cooler Heater tank has potential to release aerosolized bacteria into operating room (OR) environment
-
Ex. Nontuberculous Mycobacteria in OR environment may lead to fatal patient infection as patient's chest is open during surgery and patients are often immunocompromised


Prevent the escape and aerosolization of bacteria from CardioQuip MCH-1000(i) heater/cooler unit water tanks used during cardiac bypass surgery in the Duke Hospital operating room environment
Pugh Matrix & Initial Ideas
During our research, we learned that the lid of the CardioQuip (sitting on top of the tank and next to the fan unit) is often lifted up to add water to the tank and to check the water level. We hypothesized that this was a main point of exposure of bacterial aerosolization. We then brainstormed a few ideas that might be implemented in a medical device to tackle some of the functional specifications we decided on, as seen in the pugh matrix below.

Design Sketch
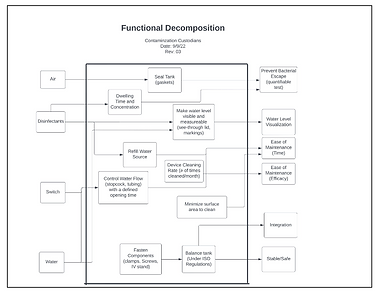
We developed a functional decomposition of what our device would do and developed a flow diagram describing how the device would work and what user actions are required.


Following these diagrams and after a few design iterations, we landed on the rough final sketch below. The idea of our device was to replace the steel lid currently on the CardioQuip device with a see-through acrylic lid with components built within the lid. This lid would have a built in light source to illuminate the inside of the tank and a collimator viewing hole that would allow the user to check the water level without having to open up the lid. Also, we included an U/S sensor along with indicator LEDs to provide an extra safety threshold to make sure the water level in the device was not too high or too low. Finally, a one-way valve with a cap was incorporated to allow the user to add water to the tank without having to open up the lid.


Design Iteration & Testing
We utilized CAD, EDA, and acrylic laser cutting/bending to prototype our device. With each iteration, we tested our prototypes against the functional specifications we decided on prior. An example is shown below where we test the brightness of our light source to make sure it illuminates the inside of the tank enough for the user to see inside.


Final Design & Safety Analysis
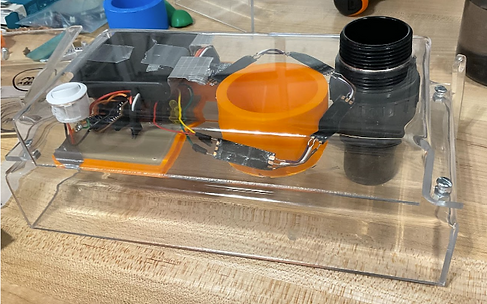
Below is the acrylic lid design that my team and I built. We presented our idea to our clients at the Duke hospital and they received it positively, suggesting next steps of conducting additional tests to further test the ability of our device in preventing CardioQuip related infections in the Duke hospital setting. A fault tree analysis was conducted to speculate where faults could occur in our device. This along with a more comprehensive description of our design process can be found in our final report below.

Challenges Faced
One of the biggest challenges we faced in developing our device was actually constructing it. We found that acrylic bending by heating up edges of laser cut shapes and manually bending it was time-consuming and not very precise. We also ran into trouble with parts not fitting with each other as we sometimes did not take into account tolerance. Finally, the device we ended up with is still a prototype, as pieces were glued and taped together to make the device quickly in order to test it and demonstrate it to our clients. Wires are exposed and parts are visible. One idea for a future iteration could be to spray paint the outside of the device to cover up and hide the internal components of the lid.